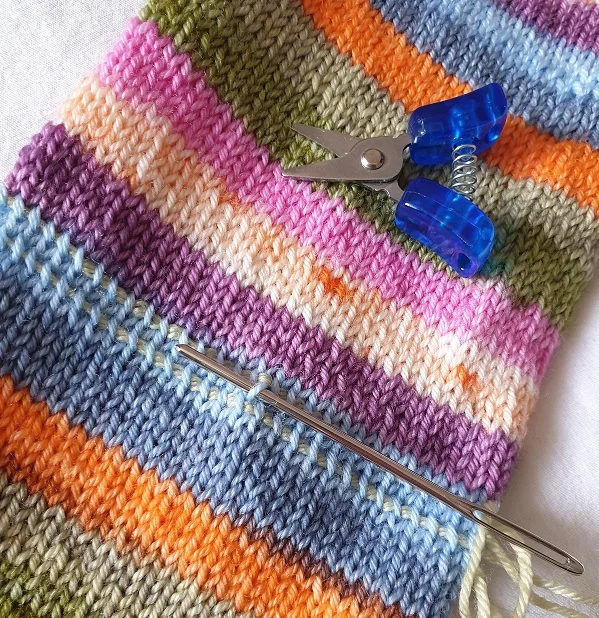
Tutorials

How to knit on tiny circular needles

I'm a huge fan of knitting in the round -socks, sleeves and pretty much anything I can do on circular needles I will. I tend to mainly use magic loop but for travel knitting where elbow space is limited or where I need to be able to drop my knitting at a moment's notice (and not miss my stop) I tend to use tiny circular needles.

I generally use the 23cm (9”) diameter ones - these particular ones are Addi sock rockets but other brands also do them.

I often get asked how I knit with them and so I thought I would note down a few tips and pointers to help get you started.

The first thing to say is that they aren't everyone's cup of tea. Some people love them, some hate them and that's entirely fine. We all have our preferred ways of knitting.

  • Give it time - it will feel strange at first and that’s OK. Give yourself time to adjust to the new sensations, how they feel in your hands.

  • Relax your grip - I tend to hold my needles quite tightly anyway but I found that with tiny circulars it really does help to loosen the death grip a bit. Not only will your fingers cramp less but it will feel a lot more comfortable

  • Try to use the tips of your fingers - this can be tricky if your knitting style means that you tend to rest the needles on your palms usually. Keep movements small and light - again trying to keep a light hold on the needle tips as you guide the yarn really helps.

I’ve heard it said that it’s easier to master tiny circular needles if you are a “thrower” rather than a “picker/Continental style”. I’m not sure if there’s any truth to that as I can knit both ways and both seem equally comfortable.

One thing I would say is that unlike with magic loop or DPNs, there is no natural pause whilst you are knitting. There is no point in proceedings where you have to stop to rearrange your stitches or needles. That’s great from the point of view of efficiency but it does mean that you need to make a conscious effort to stop and stretch your hand muscles from time to time.

Many people complain of hand cramps when using small circulars but I find that a short stretch every 10 minutes or so is really helpful. The Loopy Ewe published a short series of ‘Exercises for Knitters’ a while ago which is really useful if you are interested.

Anyway, I hope these few pointers help you to overcome your fear of the tiny circs and give them a go - do let me know if you do try them. I’d love to know what you think.


PIN FOR LATER


Super Sock Snake

This blog post could also be titled “How to Knit a Sock Snake” - or indeed -why you would want to do such a thing.

Now, you know me - I love a bit of knitting efficiency and I like to knit socks in those spare in-between moments of travel and general hanging around. A recent long train journey meant that I got a bit carried away with the toe-up socks I was knitting. I normally knit around a 16” tube if I’m going to be adding a cuff and an afterthought heel but on this occasion I was engrossed in my Kindle, sipping my coffee and knitting away.

It was only when I got to my destination that I realised that I had in fact knitted close to 22” - practically the foot of sock number 2.

I was absolutely not going to rip out 6” of perfectly good sock so I decided to make a virtue out of a necessity and carry on to make a long sock snake. I had seen someone else on Instagram do this a while ago and the idea had stuck with me since then.

So many people asked about it that I said I would write it up as a short tutorial and so if you’d like a copy of this tutorial - you can find a PDF of it on my Payhip site.

Step 1: knit your snake.

For toe-up socks (8-9” foot circumference, 4ply yarn and 2.25mm needles) I cast on 24 sts using Judy’s magic cast on - 12 on each needle - and work a standard sock toe with increases on alternate rows (to 64 sts). Then knit, and knit...and knit some more. I knit until the tube measured 31” from the cast on and then added a second toe at the other end.

Step 2: divide your snake in half and decide where you are going to snip.

I like to fold the sock flat and pick the midway point - mark it with a pin. Then unfold it and lay it flat in front of you. Using a tapestry needle and waste yarn, slide 1 full round of stitches onto the waste yarn. Repeat with a second length of yarn - leaving one round between each lifeline

Step 3: Snip (it sounds less scary than cut)

Once your stitches are secure on your two lifelines they can’t go anywhere. Using sharp scissors - snip a stitch in between the two lines and gently unravel the yarn - I like to use the tip of the tapestry needle. Continue around the whole sock until your sock snake becomes 2 shorter snakes.

Step 4: Add cuffs

Return the live stitches to needles, join in your chosen yarn and add cuffs to the two tubes

Step 5: Add afterthought heels

Using the same lifeline process - just across 32 stitches though - add in afterthought heels.

And hey presto - 2 separate socks.


PIN FOR LATER

How to avoid 'ears' on toe-up socks

An ‘ear-free’ sock toe

It’s such a tiny thing to worry about in the greater scheme of things, I know. But if you’ve ever been annoyed by that tiny sticky-out ear that you sometimes get when you start a sock toe, then this tip might help you.

I’ve been starting socks this way for so long that I can’t remember where I heard it first. It might have been either via Paula of the Knitting Pipeline podcast, or Susan B Anderson - both fabulous sock knitting gurus.

It’s ludicrously simple to do - you just need to unlearn the first piece of advice you were ever given as a new knitter and don’t start with a slip knot. It is this tiny knit which sticks out in the fabric, no matter how tightly you try to pull it and gives that annoying little lump on the very outside part of the toe.

Don’t use a slip knot when casting on

Instead of tying a slip knot, just drape the yarn over the needle and then arrange the yarn as you would do normally for a Judy’s magic cast on - yarn tail over index finger and the end nearest to the yarn ball around your thumb.

You might find it helpful to give a twist to the yarn before you start casting on - just to anchor it and give you something firmer to knit into on the first row. But once you’ve got that first fiddly stitch into the loose loop out of the way it’s plain sailing.

No, tiny knot and no annoying sock ears!

Do give it a go and let me know what you think.

PIN FOR LATER