The wonderful things about mitered square blankets (sometimes called memory blankets) is that you can really personalise them and make them your own. Most patterns are really just a basic recipe to help you get the idea of how they are constructed and after that you really can freestyle to your hearts content. They are ideal for stashbusting and using up scraps of yarn - it's so pleasing to construct a real, beautiful, practical "thing" from a what is essentially a bag full of scraps.
Many mitered square blankets embrace the colourful nature of hand-dyed sock yarn and show it off to great effect. You can go as wild as you like or stick to a more restrained colour palette.
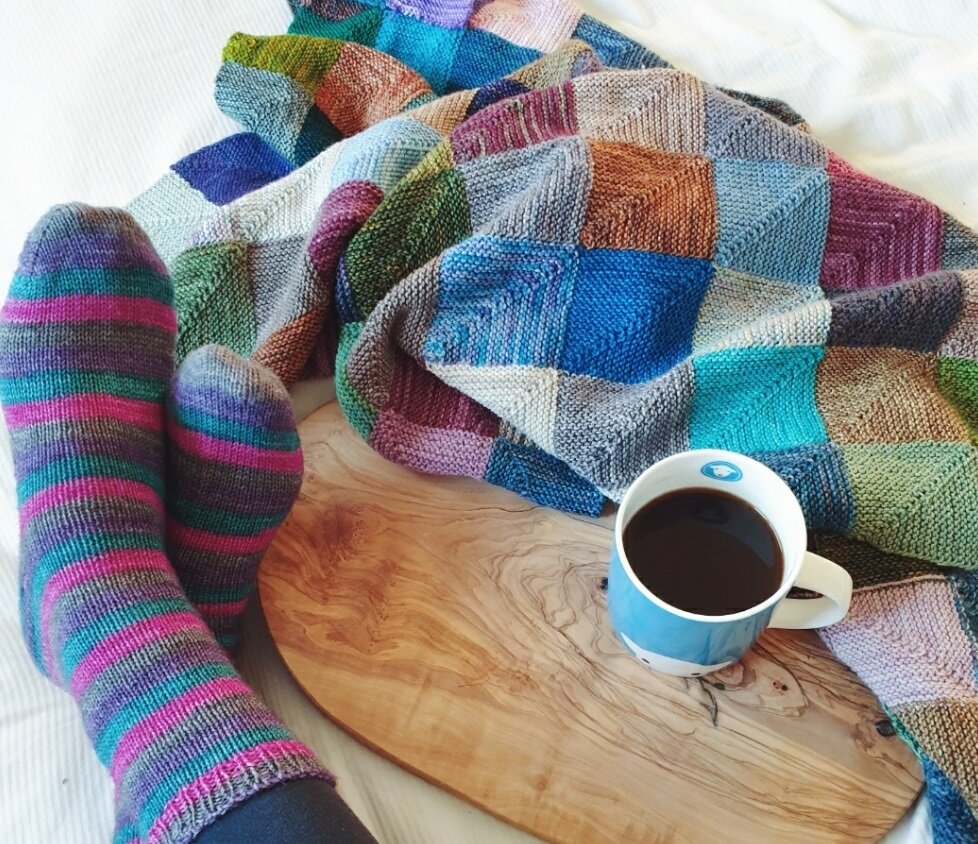
My Mitered Square blanket is often commented on although in truth it still isn't finished. I still use it as a blanket - I just haven't yet decided how large I want it to be. So every now and again I'll pull it out and add another row of squares. Each little square only uses about 3g yarn (yes - I really did measure it on my little digital scales) and so it's perfect for using up all but the tiniest bits of yarn. If you don't have tiny digital scales, a tightly wound ball of sock yarn equivalent in size to a walnut approximates to about 5g yarn in my experience.
Unless you have a very specific colour scheme in mind there a few points it is worth considering before you start your blanket.
Variety: In most cases the blankets really do look better with more variety in colour. To get the best result you really do need a lot of different scraps otherwise you run the risk of the same colour cropping up too frequently (or even adjoining). If that's fine with you then by all means go for it but one of the most common complaints from people who have started a blanket and then stopped is that they don't have enough variety to choose from. For this reason, sock yarn mini swaps are quite common amongst knitters and knitting groups.
Size of squares: It sounds blindingly obvious but it's worth mentioning at the start. The larger your individual squares are the more yarn they will need. Some people embrace this wholeheartedly and are happy to just knit large squares and add in new colours to the square as each scrap runs out. My brain is wired to need a little more order than that, so I'm happiest when I can complete a small square in one single colour. I've also seen some really fantastic blankets knit with teeny, tiny squares (about an inch across) which look fantastic - but the thought of all those ends is enough to make me hyperventilate.
Portability: Again, forgive me for stating the obvious but apart from the initial stages, this is not a very portable project. You have to take your yarn scraps with you if you want to work on it out of the house and if you are the type who likes order and symmetry (raises hand) then you might need to have space to spread it out and determine where colours are placed.

Square 1
Square 1:
This tutorial starts by casting on 20 stitches with a stitch marker placed on the needle at the halfway point. This will yield a very small square though, so for your blanket you might want to think about starting with 40 stitches in total (20 +20).
For my sock yarn blanket I use a 3.25 mm needle - the fabric doesn't need to be as dense as for socks - but's worth experimenting a little to get a fabric you are happy with. You are going to be spending a lot of time with this project after all.
With your first yarn, cast on 10 stitches using the long tail cast on, place a marker and then cast on another 10. The next row is your right side and you are going to work as follows:
RS: Knit to 2 st before marker, ssk, slip marker, k2tog, knit to end.
WS: K
These 2 rows form the basis of your mitered square.
All you are doing is decreasing two stitches on either side of the central marker on each RS row. WS rows are just knit all the way across. If you find yourself getting confused about your right and wrong side, clip a removable stitch marker into the fabric of the right side. Once you add in more squares and join in colours it will be much more obvious which is the right side.
Keep working in this manner until you have 2 stitches left on the needle. Pass the first stitch over the 2nd to bind off, break yarn and draw the yarn through the loop to finish your square. Now the fun starts as you pick a second colour to join to the first.

Square 2
First you need to cast on stitches for one side of your square (10 for this example), place a marker and then pick up and knit 10 stitches from the right hand side of the square (the right side as you look at it).This is done with the right side of your first square facing you - stitches are always picked up in this manner.
Turn the work and knit 1 row (WS), then proceed as usual with your mitered decreases.
Carry on as usual and in no time at all you will have a second square joined to the first.

Square 3
Square 3
With your third colour you are now going to pick up and knit stitches along the left hand side of square 1. In our example that means picking up and knitting 10 stitches with your new colour, placing a marker and then casting on a further 10.
To easily cast on stitches in the middle of a row I like to use the simple thumb cast on. For many of us, this is how we first learn to cast on and whilst it can be a bit loopy and lacing in structure, in my experience it's fine for these little squares. After this you just proceed as you did with square 2. Knit back along the WS and then continue alternating decrease and plain rows.

Square 4
Square 4: Are you hooked yet?
The 'corner' patches are always fun as you are picking up stitches from sides of 2 squares. With your next colour, pick up and knit 10 stitches from the left hand side of square 2, place marker and pick up another 10 stitches from the right hand side of square 3.
Turn and knit along the WS. Then work as usual.
From this point on it really is just a matter of having fun and playing with colour. You will start the next section by casting on 10 stitches, placing a marker and then picking up and knitting along the left hand side of square 2.
Once you get the hang of it, it really does become intuitive and you'll be excited to see how it starts to come together. The only mistake you can really make is to accidentally start your mitered decreases in the wrong corner but, honestly you'll soon see if you've done that - and you could always call it a design feature. Honestly, the hardest part, once you get into the swing of it is choosing the next colour - but that’s also the most fun.
As this is a bit of long tutorial, that you might want to save and come back to I have condensed it into a handy PDF. The Mitered Square ebook has been re-written for 2023 and now includes information on the yarn amounts you’ll need for different sizes of squares - and for options in different yarn weights too (sock weight, DK and with sock yarn held double.
PIN FOR LATER
